


在此输入您的增值税号,然后单击验证:
您的详细信息已经过验证。增值税号注册至:
,
。
现在,您的订单的增值税税率为零。我们保留在您提出订单请求后验证这些详细信息的权利,并在需要时恢复增值税。
您的增值税详细信息无法识别或无效。您的增值税号必须与上面指定的帐单国家/地区相匹配。当前指定为 。您无需输入增值税号的国家/地区代码部分,因为已在上面的帐单地址详细信息中选择了该部分。
增值税号查询服务目前已离线。请在下面的评论或特殊说明字段中提供您的增值税详细信息,我们将在您提出订单请求后应用增值税折扣。
Category Filter
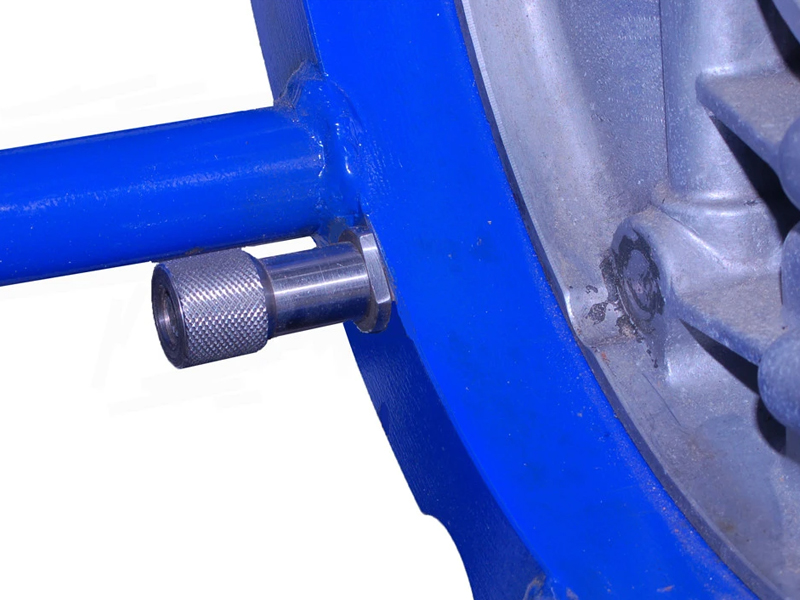
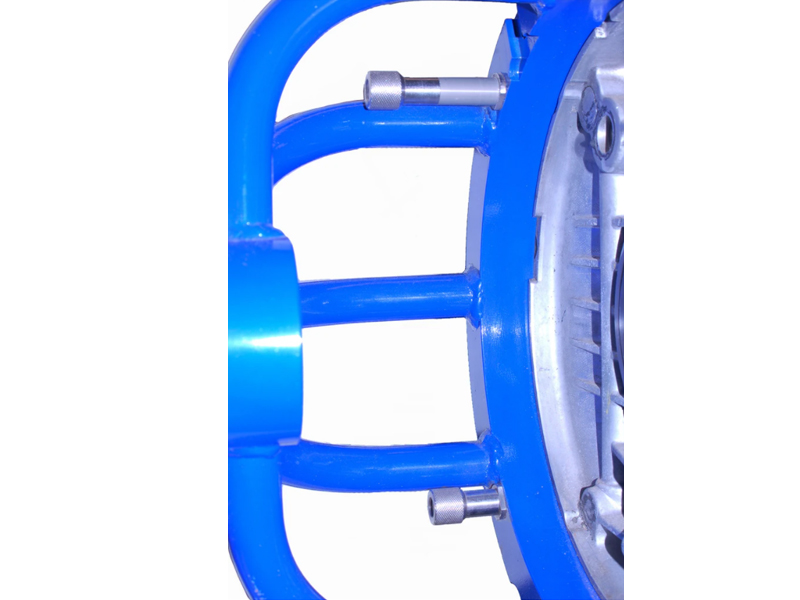
适用于保时捷 Boxster 和 911 M96/M97 的后主轴油封安装工具 - 0PB105249
0PB105249/2

产品车辆组
- Porsche Boxster 986 2.5L 1997-99
- Porsche Boxster 986 2.7L 1999-02
- Porsche Boxster S 986 3.2L 1999-02
- Porsche Boxster 986 2.7L 2003-04
- Porsche Boxster S 986 3.2L 2003-04
- Porsche Boxster 987 2.7L 2005-08/08
- Porsche Boxster 987 S 3.2/3.4L 2005-08/08
- Porsche 996 C2 3.4L 1997-08/01
- Porsche 996 C4 3.4L 1997-08/01
- Porsche 996 C2 3.6L 09/01-2005
- Porsche 996 C4 3.6L 09/01-2005
- Porsche 996 C4S 3.6L 09/01-2005
- Porsche 997 MK1 Carrera 2 3.6L 2005-08
- Porsche 997 MK1 Carrera 2S 3.8L 2005-08
- Porsche 997 MK1 Carrera 4 3.6L 2005-08
- Porsche 997 MK1 Carrera 4S 3.8L 2005-08
- Porsche Cayman 2.7L 987C 2006-08
- Porsche Cayman S 3.4L 987C 2005-08
Information
保时捷 Boxster 和 911 M96/M97 后主轴油封安装工具

合身
Boxster/Cayman 1997-2008
保时捷 911 Carrera 1999-2008 (不包括 Turbo、GT3 和 GT2 车型)
工具描述
这是一款用于安装保时捷M96/M97发动机后曲轴油封的3D打印工具,确保油封安装到正确深度且不会损坏油封。该工具采用坚硬的黑色塑料3D打印而成,非常坚固耐用。由于其价格远低于保时捷官方工具,因此主要面向DIY爱好者和业余人士,同时也非常适合小型独立维修厂,因为该工具可以多次重复使用而不会损坏。
如何使用
使用此工具时务必小心谨慎。虽然其设计旨在尽可能简化密封件的安装,但如果安装不当,仍可能损坏或错误安装密封件。对于因错误使用此工具而可能对密封件或车辆发动机造成的损坏,我们概不负责。我们建议您始终使用数显卡尺或其他测量工具进行确认,以确保密封件安装深度正确。
使用此工具还需要 4 个 M10 x 75mm 螺栓和 4 个垫圈。这是为了弥补工具的额外厚度,并将螺栓的力分散到工具表面。
首先必须正确安装密封圈,然后轻轻地将其放入曲轴周围的开口中。具体操作方法是:先将蓝色塑料环留在原位,然后将密封圈套在曲轴末端。接着轻轻地将密封圈推入到位,使曲轴末端将蓝色塑料环推出密封圈,并将密封圈推到曲轴外侧。
接下来,将RMS安装工具套在油封上,并将4个螺栓分别穿过工具上的孔拧入曲轴。确保工具方向正确,使曲轴上飞轮导向销的切口与导向销对齐。缓慢拧入每个螺栓,直至其几乎与工具端面接触。从此时开始,油封将被装入发动机。
每次拧紧一个螺栓,拧四分之一圈,四个螺栓都拧紧四分之一圈后再拧紧第一个,如此循环。务必每次只拧紧一个螺栓,确保密封圈安装笔直,避免倾斜,以免损坏密封圈。
重复此操作,直至曲轴端面与工具内表面接触,且无法再将油封推入为止。请注意,该工具为塑料材质,因此在此处施加过大的力可能会损坏工具,并导致油封推入过深。
现在可以拧下曲轴上的4颗螺栓并将其完全取下。然后即可取出工具。工具可能略微紧实,如果用手难以取出,工具侧面有槽口,可以用螺丝刀或撬棒夹住工具将其取出。如果使用槽口,请务必均匀施力,确保工具两侧受力一致,以免工具倾斜取出卡住或导致密封件移位。
工具和螺栓拆下后,目视检查油封,确保没有损坏。然后,使用直尺、数显卡尺或深度计测量油封的深度。从曲轴端面到油封端面的距离应为 13 毫米。只要工具使用正确且适用于您的发动机,油封的安装深度就应该正确。
这些说明仅供参考,您应始终查阅维修手册或在线搜索相关信息,以确保正确安装零件。使用此工具需要一定的实践经验,如果您对自己的能力没有信心,请不要尝试自行安装密封件。
相关参考编号
相关编号、被取代编号、交叉引用编号或替代编号,供比较之用。
0PB105249
您正在查看的产品与这些编号存在交叉引用关系
合身
Boxster/Cayman 1997-2008
保时捷 911 Carrera 1999-2008 (不包括 Turbo、GT3 和 GT2 车型)
工具描述
这是一款用于安装保时捷M96/M97发动机后曲轴油封的3D打印工具,确保油封安装到正确深度且不会损坏油封。该工具采用坚硬的黑色塑料3D打印而成,非常坚固耐用。由于其价格远低于保时捷官方工具,因此主要面向DIY爱好者和业余人士,同时也非常适合小型独立维修厂,因为该工具可以多次重复使用而不会损坏。
如何使用
使用此工具时务必小心谨慎。虽然其设计旨在尽可能简化密封件的安装,但如果安装不当,仍可能损坏或错误安装密封件。对于因错误使用此工具而可能对密封件或车辆发动机造成的损坏,我们概不负责。我们建议您始终使用数显卡尺或其他测量工具进行确认,以确保密封件安装深度正确。
使用此工具还需要 4 个 M10 x 75mm 螺栓和 4 个垫圈。这是为了弥补工具的额外厚度,并将螺栓的力分散到工具表面。
首先必须正确安装密封圈,然后轻轻地将其放入曲轴周围的开口中。具体操作方法是:先将蓝色塑料环留在原位,然后将密封圈套在曲轴末端。接着轻轻地将密封圈推入到位,使曲轴末端将蓝色塑料环推出密封圈,并将密封圈推到曲轴外侧。
接下来,将RMS安装工具套在油封上,并将4个螺栓分别穿过工具上的孔拧入曲轴。确保工具方向正确,使曲轴上飞轮导向销的切口与导向销对齐。缓慢拧入每个螺栓,直至其几乎与工具端面接触。从此时开始,油封将被装入发动机。
每次拧紧一个螺栓,拧四分之一圈,四个螺栓都拧紧四分之一圈后再拧紧第一个,如此循环。务必每次只拧紧一个螺栓,确保密封圈安装笔直,避免倾斜,以免损坏密封圈。
重复此操作,直至曲轴端面与工具内表面接触,且无法再将油封推入为止。请注意,该工具为塑料材质,因此在此处施加过大的力可能会损坏工具,并导致油封推入过深。
现在可以拧下曲轴上的4颗螺栓并将其完全取下。然后即可取出工具。工具可能略微紧实,如果用手难以取出,工具侧面有槽口,可以用螺丝刀或撬棒夹住工具将其取出。如果使用槽口,请务必均匀施力,确保工具两侧受力一致,以免工具倾斜取出卡住或导致密封件移位。
工具和螺栓拆下后,目视检查油封,确保没有损坏。然后,使用直尺、数显卡尺或深度计测量油封的深度。从曲轴端面到油封端面的距离应为 13 毫米。只要工具使用正确且适用于您的发动机,油封的安装深度就应该正确。
这些说明仅供参考,您应始终查阅维修手册或在线搜索相关信息,以确保正确安装零件。使用此工具需要一定的实践经验,如果您对自己的能力没有信心,请不要尝试自行安装密封件。
相关参考编号
相关编号、被取代编号、交叉引用编号或替代编号,供比较之用。
0PB105249
0PB105249
99911349040
99710121201
0PB105249
0PB105249
您正在查看的产品与这些编号存在交叉引用关系
£95.00
当前 £85.50
库存
相关产品

产品车辆组
- Porsche 911 1965-1968 2.0L / 912 SWB (F)
- Porsche 911 1968-1973 2.2L / 2.4L / 2.7L RS LWB (F)
- Porsche 911 1974-1977 2.7L / 1976-77 3.0 Carrera
- Porsche 911 1978-1983 3.0L / SC
- Porsche 914 (1970-1976)
Information
所有保时捷工厂工具包均包含此皮带轮固定扳手,在松开交流发电机螺母以更换三角皮带时与套筒扳手一起使用。
#北环赛道#
适合:
保时捷 911 2.0L / 2.2L / 2.4L 1969-74 年
保时捷 914-6 1970-72
相关参考编号
相关编号、被取代编号、交叉引用编号或替代编号,供比较之用。
91172170200
您正在查看的产品与这些编号存在交叉引用关系
#北环赛道#
适合:
保时捷 911 2.0L / 2.2L / 2.4L 1969-74 年
保时捷 914-6 1970-72
相关参考编号
相关编号、被取代编号、交叉引用编号或替代编号,供比较之用。
91172170200
1124
91172170200
您正在查看的产品与这些编号存在交叉引用关系
£31.00
当前 £27.90
缺货订单

产品车辆组
- Porsche 911 1965-1968 2.0L / 912 SWB (F)
- Porsche 911 1968-1973 2.2L / 2.4L / 2.7L RS LWB (F)
- Porsche 911 1974-1977 2.7L / 1976-77 3.0 Carrera
- Porsche 911 1978-1983 3.0L / SC
- Porsche 911 1984-1986 3.2L
- Porsche 911 1987-1989 3.2L G50
- Porsche 911 1975-1977 3.0L Turbo (930)
- Porsche 911 1978-1989 3.3L Turbo (930)
- Porsche 924 2.0L 1976-79
- Porsche 924 2.0L 1980-85
- Porsche 924 Turbo 2.0L 1979-81
- Porsche 924 Turbo 2.0L 1982-84
- Porsche 924 Carrera GT 2.0L 1981
- Porsche 924 Carrera GTS 2.0L 1982
- Porsche 924S 2.5L 1986-87
- Porsche 924S 2.5L 1988
- Porsche 944 2.5L 8V 1982-87
- Porsche 944 2.7L 8V 1988-89
- Porsche 944S 2.5L 16V 1987-88
- Porsche 944S2 3.0L 16V 1989-91
- Porsche 944 Turbo 2.5L 8V 1985-88
- Porsche 944 Turbo 2.5L 8V 1989-91
- Porsche 944 Turbo S 2.5L 8V 1988
- Porsche 968 3.0L 1992-94
- Porsche 968 Sport 3.0L 1994-95
- Porsche 968 CS 3.0L 1993-95
- Porsche 968 Turbo S 3.0L 1993-94
- Porsche 928 4.5L 1978-82
- Porsche 928S 4.7L 1981-83
- Porsche 928S2 4.7L 1984-86
- Porsche 928S4 5.0L 1987-92
- Porsche 928GT 5.0L 1989-91
- Porsche 928GTS 5.4L 1992-95
- Porsche 356 1950-55
- Porsche 356A 1955-59
- Porsche 356B 1959-63
- Porsche 356C 1963-65
- Porsche 914 (1970-1976)
Information
轴承润滑脂(200克)
#保时捷#
適用於:
保时捷 356(1950 年至 1965 年)
保时捷 911/912(1965 年至 1989 年)
保时捷 914(1970 年至 1976 年)
保时捷 924 / 924 S(1976 年至 1988 年)
保时捷 928(1978 年至 1995 年)
保时捷 944 /2(1982 年至 1991 年)
保时捷 968(1992 年至 1995 年)
相关参考编号
相关编号、被取代编号、交叉引用编号或替代编号,供比较之用。
PCG04311000
您正在查看的产品与这些编号存在交叉引用关系
#保时捷#
適用於:
保时捷 356(1950 年至 1965 年)
保时捷 911/912(1965 年至 1989 年)
保时捷 914(1970 年至 1976 年)
保时捷 924 / 924 S(1976 年至 1988 年)
保时捷 928(1978 年至 1995 年)
保时捷 944 /2(1982 年至 1991 年)
保时捷 968(1992 年至 1995 年)
相关参考编号
相关编号、被取代编号、交叉引用编号或替代编号,供比较之用。
PCG04311000
PCG04311000
您正在查看的产品与这些编号存在交叉引用关系
£21.69
当前 £19.52
由供应商供货
